Overview
Wasp supports e-mail authentication out of the box, along with email verification and "forgot your password?" flows. It provides you with the server-side implementation and email templates for all of these flows.

Wasp currently doesn't support multiple auth identities for a single user. This means, for example, that a user can't have both an email-based auth identity and a Google-based auth identity. This is something we will add in the future with the introduction of the account merging feature.
Account merging means that multiple auth identities can be merged into a single user account. For example, a user's email and Google identity can be merged into a single user account. Then the user can log in with either their email or Google account and they will be logged into the same account.
Setting Up Email Authentication
We'll need to take the following steps to set up email authentication:
- Enable email authentication in the Wasp file
- Add the
Userentity - Add the auth routes and pages
- Use Auth UI components in our pages
- Set up the email sender
Structure of the main.wasp.ts file we will end up with:
import { app, page, route } from "@wasp.sh/spec"
import { SignupPage } from "./src/pages/auth" with { type: "ref" }

// Configuring e-mail authentication
export default app({
  name: "myApp",
  wasp: { version: "^0.24" },
  title: "My App",
  head: ["<link rel='icon' href='/favicon.ico' />"],
  auth: {
    // ...
  },
  emailSender: {
    // ...
  },
  spec: [
    // Defining routes and pages
    route("SignupRoute", "/signup", page(SignupPage)),
    // ...
  ],
})
1. Enable Email Authentication in main.wasp.ts
Let's start with adding the following to our main.wasp.ts file:
import { app } from "@wasp.sh/spec"

export default app({
  name: "myApp",
  wasp: { version: "^0.24" },
  title: "My App",
  head: ["<link rel='icon' href='/favicon.ico' />"],
  auth: {
    // 1. Specify the user entity (we'll define it next)
    userEntity: "User",
    methods: {
      // 2. Enable email authentication
      email: {
        // 3. Specify the email from field
        fromField: {
          name: "My App Postman",
          email: "hello@itsme.com"
        },
        // 4. Specify the email verification and password reset options (we'll talk about them later)
        emailVerification: {
          clientRoute: "EmailVerificationRoute",
        },
        passwordReset: {
          clientRoute: "PasswordResetRoute",
        },
      },
    },
    onAuthFailedRedirectTo: "/login",
    onAuthSucceededRedirectTo: "/"
  },
  // ...
})
Read more about the email auth method options in the EmailAuthConfig API Reference.
2. Add the User Entity
The User entity can be as simple as including only the id field:
- JavaScript
- TypeScript
// 5. Define the user entity
model User {
  id Int @id @default(autoincrement())
  // Add your own fields below
  // ...
}
// 5. Define the user entity
model User {
  id Int @id @default(autoincrement())
  // Add your own fields below
  // ...
}
You can read more about how the User is connected to the rest of the auth system and how you can access the user data in the Accessing User Data section of the docs.
3. Add the Routes and Pages
Next, we need to define the routes and pages for the authentication pages.
Add the following to the main.wasp.ts file:
import { app, page, route } from "@wasp.sh/spec"
import {
  LoginPage,
  SignupPage,
  RequestPasswordResetPage,
  PasswordResetPage,
  EmailVerificationPage,
} from "./src/pages/auth" with { type: "ref" }

export default app({
  // ...
  spec: [
    route("LoginRoute", "/login", page(LoginPage)),
    route("SignupRoute", "/signup", page(SignupPage)),
    route(
      "RequestPasswordResetRoute",
      "/request-password-reset",
      page(RequestPasswordResetPage)
    ),
    route("PasswordResetRoute", "/password-reset", page(PasswordResetPage)),
    route("EmailVerificationRoute", "/email-verification", page(EmailVerificationPage)),
  ],
})
We'll define the React components for these pages in the src/pages/auth.tsx file below.
4. Create the Client Pages
We are using Tailwind CSS to style the pages. Read more about how to add it here.
Let's create a auth.tsx file in the src/pages folder and add the following to it:
- JavaScript
- TypeScript
import {
LoginForm,
SignupForm,
VerifyEmailForm,
ForgotPasswordForm,
ResetPasswordForm,
} from "wasp/client/auth"
import { Link } from "react-router"
export function LoginPage() {
return (
<Layout>
<LoginForm />
<br />
<span className="text-sm font-medium text-gray-900">
Don't have an account yet? <Link to="/signup">go to signup</Link>.
</span>
<br />
<span className="text-sm font-medium text-gray-900">
Forgot your password? <Link to="/request-password-reset">reset it</Link>.
</span>
</Layout>
)
}
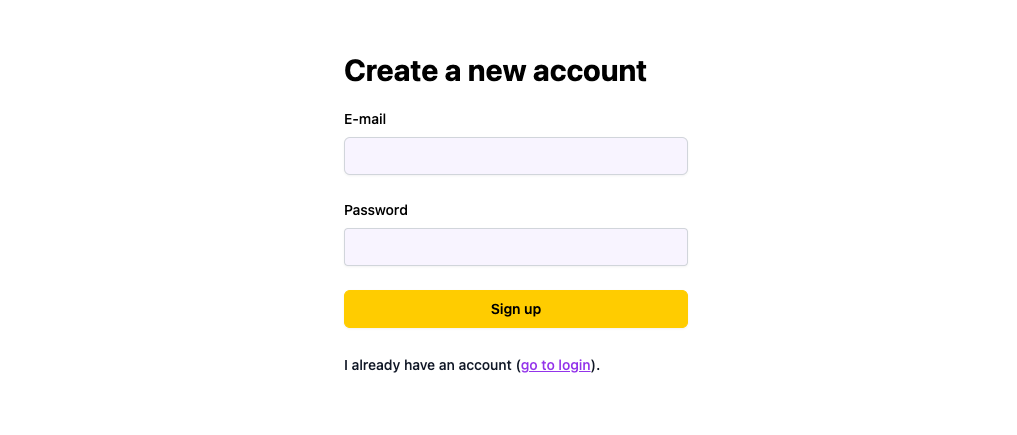
export function SignupPage() {
return (
<Layout>
<SignupForm />
<br />
<span className="text-sm font-medium text-gray-900">
I already have an account (<Link to="/login">go to login</Link>).
</span>
</Layout>
)
}
export function EmailVerificationPage() {
return (
<Layout>
<VerifyEmailForm />
<br />
<span className="text-sm font-medium text-gray-900">
If everything is okay, <Link to="/login">go to login</Link>
</span>
</Layout>
)
}
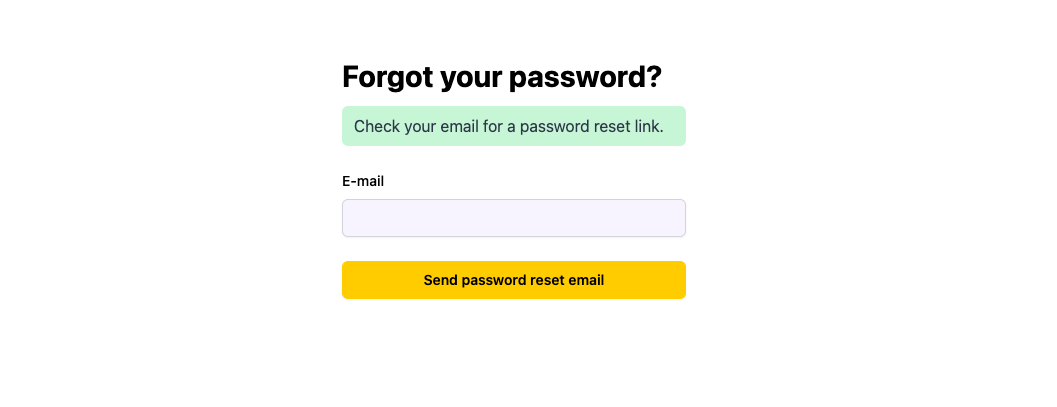
export function RequestPasswordResetPage() {
return (
<Layout>
<ForgotPasswordForm />
</Layout>
)
}
export function PasswordResetPage() {
return (
<Layout>
<ResetPasswordForm />
<br />
<span className="text-sm font-medium text-gray-900">
If everything is okay, <Link to="/login">go to login</Link>
</span>
</Layout>
)
}
// A layout component to center the content
export function Layout({ children }) {
return (
<div className="h-full w-full bg-white">
<div className="flex min-h-[75vh] min-w-full items-center justify-center">
<div className="h-full w-full max-w-sm bg-white p-5">
<div>{children}</div>
</div>
</div>
</div>
)
}
import {
  LoginForm,
  SignupForm,
  VerifyEmailForm,
  ForgotPasswordForm,
  ResetPasswordForm,
} from "wasp/client/auth"
import { Link } from "react-router"

export function LoginPage() {
  return (
    <Layout>
      <LoginForm />
      <br />
      <span className="text-sm font-medium text-gray-900">
        Don't have an account yet? <Link to="/signup">go to signup</Link>.
      </span>
      <br />
      <span className="text-sm font-medium text-gray-900">
        Forgot your password? <Link to="/request-password-reset">reset it</Link>.
      </span>
    </Layout>
  )
}

export function SignupPage() {
  return (
    <Layout>
      <SignupForm />
      <br />
      <span className="text-sm font-medium text-gray-900">
        I already have an account (<Link to="/login">go to login</Link>).
      </span>
    </Layout>
  )
}

export function EmailVerificationPage() {
  return (
    <Layout>
      <VerifyEmailForm />
      <br />
      <span className="text-sm font-medium text-gray-900">
        If everything is okay, <Link to="/login">go to login</Link>
      </span>
    </Layout>
  )
}

export function RequestPasswordResetPage() {
  return (
    <Layout>
      <ForgotPasswordForm />
    </Layout>
  )
}

export function PasswordResetPage() {
  return (
    <Layout>
      <ResetPasswordForm />
      <br />
      <span className="text-sm font-medium text-gray-900">
        If everything is okay, <Link to="/login">go to login</Link>
      </span>
    </Layout>
  )
}

// A layout component to center the content
export function Layout({ children }: { children: React.ReactNode }) {
  return (
    <div className="h-full w-full bg-white">
      <div className="flex min-h-[75vh] min-w-full items-center justify-center">
        <div className="h-full w-full max-w-sm bg-white p-5">
          <div>{children}</div>
        </div>
      </div>
    </div>
  )
}
We imported the generated Auth UI components and used them in our pages. Read more about the Auth UI components here.
5. Set up an Email Sender
To support e-mail verification and password reset flows, we need an e-mail sender. Luckily, Wasp supports several email providers out of the box.
We'll use the Dummy provider to speed up the setup. It just logs the emails to the console instead of sending them. You can use any of the supported email providers.
To set up the Dummy provider to send emails, add the following to the main.wasp.ts file:
export default app({
  // ...
  // 7. Set up the email sender
  emailSender: {
    provider: "Dummy",
  },
})
Conclusion
That's it! We have set up email authentication in our app. 🎉
Running wasp db migrate-dev and then wasp start should give you a working app with email authentication. If you want to put some of the pages behind authentication, read the auth overview.
Login and Signup Flows
Login

Signup
Some of the behavior you get out of the box:
- Rate limiting
We are limiting the rate of sign-up requests to 1 request per minute per email address. This is done to prevent spamming.
- Preventing user email leaks
If somebody tries to signup with an email that already exists and it's verified, we pretend that the account was created instead of saying it's an existing account. This is done to prevent leaking the user's email address.
- Allowing registration for unverified emails
If a user tries to register with an existing but unverified email, we'll allow them to do that. This is done to prevent bad actors from locking out other users from registering with their email address.
- Password validation
Read more about the default password validation rules and how to override them in auth overview docs.
Email Verification Flow
In development mode, you can skip the email verification step by setting the SKIP_EMAIL_VERIFICATION_IN_DEV environment variable to true in your .env.server file:
SKIP_EMAIL_VERIFICATION_IN_DEV=true
This is useful when you are developing your app and don't want to go through the email verification flow every time you sign up. It can be also useful when you are writing automated tests for your app.
By default, Wasp requires the e-mail to be verified before allowing the user to log in. This is done by sending a verification email to the user's email address and requiring the user to click on a link in the email to verify their email address.
Our setup looks like this:
// ...

emailVerification: {
  clientRoute: "EmailVerificationRoute",
}
When the user receives an e-mail, they receive a link that goes to the client route specified in the clientRoute field. In our case, this is the EmailVerificationRoute route we defined in the main.wasp.ts file.
The content of the e-mail can be customized, read more about it in the EmailFlowConfig API Reference.
Email Verification Page
We defined our email verification page in the auth.tsx file.
Password Reset Flow
Users can request a password and then they'll receive an e-mail with a link to reset their password.
Some of the behavior you get out of the box:
- Rate limiting
We are limiting the rate of sign-up requests to 1 request per minute per email address. This is done to prevent spamming.
- Preventing user email leaks
If somebody requests a password reset with an unknown email address, we'll give back the same response as if the user requested a password reset successfully. This is done to prevent leaking information.
Our setup in main.wasp.ts looks like this:
// ...

passwordReset: {
  clientRoute: "PasswordResetRoute",
}
Request Password Reset Page
Users request their password to be reset by going to the /request-password-reset route. We defined our request password reset page in the auth.tsx file.
Password Reset Page
When the user receives an e-mail, they receive a link that goes to the client route specified in the clientRoute field. In our case, this is the PasswordResetRoute route we defined in the main.wasp.ts file.
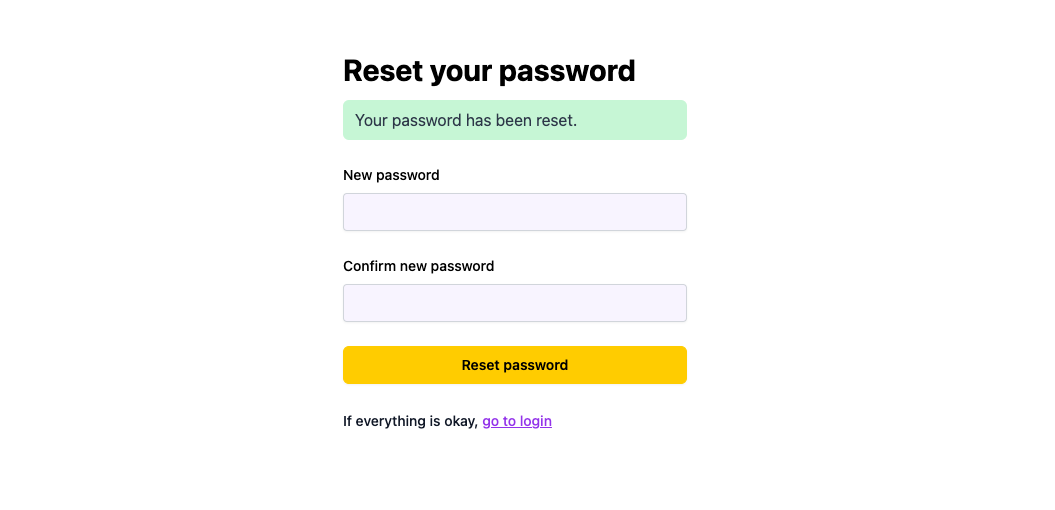
Users can enter their new password there.
The content of the e-mail can be customized, read more about it in the EmailFlowConfig API Reference.
Password
-
ensurePasswordIsPresent(args)Checks if the password is present and throws an error if it's not.
-
ensureValidPassword(args)Checks if the password is valid and throws an error if it's not. Read more about the validation rules here.
Using Auth
To read more about how to set up the logout button and how to get access to the logged-in user in our client and server code, read the auth overview docs.
When you receive the user object on the client or the server, you'll be able to access the user's email and other information like this:
const emailIdentity = user.identities.email

// Email address the user used to sign up, e.g. "fluffyllama@app.com".
emailIdentity.id

// `true` if the user has verified their email address.
emailIdentity.isEmailVerified

// Datetime when the email verification email was sent.
emailIdentity.emailVerificationSentAt

// Datetime when the last password reset email was sent.
emailIdentity.passwordResetSentAt
Read more about accessing the user data in the Accessing User Data section of the docs.
API Reference
Auth »
All the options for the auth field of the app spec, including userEntity.
EmailAuthConfig »
All the options for the email auth method.
Read more about the userSignupFields function in the Auth Overview docs.