GitHub
Wasp supports Github Authentication out of the box. GitHub is a great external auth choice when you're building apps for developers, as most of them already have a GitHub account.
Letting your users log in using their GitHub accounts turns the signup process into a breeze.
Let's walk through enabling Github Authentication, explain some of the default settings, and show how to override them.
Setting up Github Auth
Enabling GitHub Authentication comes down to a series of steps:
- Enabling GitHub authentication in the Wasp file.
- Adding the necessary Entities.
- Creating a GitHub OAuth app.
- Adding the neccessary Routes and Pages
- Using Auth UI components in our Pages.
Here's a skeleton of how our main.wasp should look like after we're done:
// Configuring the social authentication
app myApp {
  auth: { ... }
}

// Defining entities
entity User { ... }
entity SocialLogin { ... }

// Defining routes and pages
route LoginRoute { ... }
page LoginPage { ... }
1. Adding Github Auth to Your Wasp File
Let's start by properly configuring the Auth object:
- JavaScript
- TypeScript
app myApp {
  wasp: {
    version: "^0.11.0"
  },
  title: "My App",
  auth: {
    // 1. Specify the User entity  (we'll define it next)
    userEntity: User,
    // 2. Specify the SocialLogin entity (we'll define it next)
    externalAuthEntity: SocialLogin,
    methods: {
      // 3. Enable Github Auth
      gitHub: {}
    },
    onAuthFailedRedirectTo: "/login"
  },
}
2. Add the Entities
Let's now define the entities acting as app.auth.userEntity and app.auth.externalAuthEntity:
- JavaScript
- TypeScript
// ...
// 4. Define the User entity
entity User {=psl
    id          Int     @id @default(autoincrement())
    // ...
    externalAuthAssociations  SocialLogin[]
psl=}

// 5. Define the SocialLogin entity
entity SocialLogin {=psl
  id          Int       @id @default(autoincrement())
  provider    String
  providerId  String
  user        User      @relation(fields: [userId], references: [id], onDelete: Cascade)
  userId      Int
  createdAt   DateTime  @default(now())
  @@unique([provider, providerId, userId])
psl=}
externalAuthEntity and userEntity are explained in the social auth overview.
3. Creating a GitHub OAuth App
To use GitHub as an authentication method, you'll first need to create a GitHub OAuth App and provide Wasp with your client key and secret. Here's how you do it:
- Log into your GitHub account and navigate to: https://github.com/settings/developers.
- Select New OAuth App.
- Supply required information.
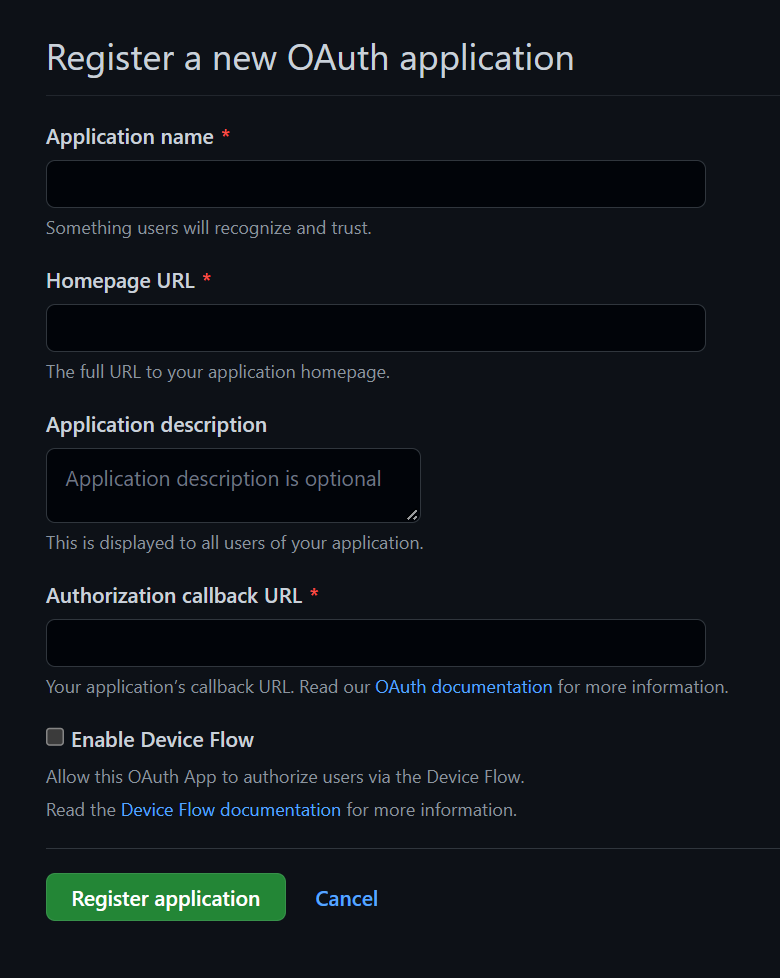
- For Authorization callback URL:
- For development, put:
http://localhost:3000/auth/login/github. - Once you know on which URL your app will be deployed, you can create a new app with that URL instead e.g.
https://someotherhost.com/auth/login/github.
- For development, put:
- Hit Register application.
- Hit Generate a new client secret on the next page.
- Copy your Client ID and Client secret as you'll need them in the next step.
4. Adding Environment Variables
Add these environment variables to the .env.server file at the root of your project (take their values from the previous step):
GITHUB_CLIENT_ID=your-github-client-id
GITHUB_CLIENT_SECRET=your-github-client-secret
5. Adding the Necessary Routes and Pages
Let's define the necessary authentication Routes and Pages.
Add the following code to your main.wasp file:
- JavaScript
- TypeScript
// ...

// 6. Define the routes
route LoginRoute { path: "/login", to: LoginPage }
page LoginPage {
  component: import { Login } from "@client/pages/auth.jsx"
}
// ...

// 6. Define the routes
route LoginRoute { path: "/login", to: LoginPage }
page LoginPage {
  component: import { Login } from "@client/pages/auth.tsx"
}
We'll define the React components for these pages in the client/pages/auth.tsx file below.
6. Creating the Client Pages
We are using Tailwind CSS to style the pages. Read more about how to add it here.
Let's create a auth.tsx file in the client/pages folder and add the following to it:
- JavaScript
- TypeScript
import { LoginForm } from '@wasp/auth/forms/Login'

export function Login() {
  return (
    <Layout>
      <LoginForm />
    </Layout>
  )
}

// A layout component to center the content
export function Layout({ children }) {
  return (
    <div className="w-full h-full bg-white">
      <div className="min-w-full min-h-[75vh] flex items-center justify-center">
        <div className="w-full h-full max-w-sm p-5 bg-white">
          <div>{children}</div>
        </div>
      </div>
    </div>
  )
}
import { LoginForm } from '@wasp/auth/forms/Login'

export function Login() {
  return (
    <Layout>
      <LoginForm />
    </Layout>
  )
}

// A layout component to center the content
export function Layout({ children }: { children: React.ReactNode }) {
  return (
    <div className="w-full h-full bg-white">
      <div className="min-w-full min-h-[75vh] flex items-center justify-center">
        <div className="w-full h-full max-w-sm p-5 bg-white">
          <div>{children}</div>
        </div>
      </div>
    </div>
  )
}
We imported the generated Auth UI component and used them in our pages. Read more about the Auth UI components here.
Conclusion
Yay, we've successfully set up Github Auth! 🎉

Running wasp db migrate-dev and wasp start should now give you a working app with authentication.
To see how to protect specific pages (i.e., hide them from non-authenticated users), read the docs on using auth.
Default Behaviour
Add gitHub: {} to the auth.methods dictionary to use it with default settings.
- JavaScript
- TypeScript
app myApp {
  wasp: {
    version: "^0.11.0"
  },
  title: "My App",
  auth: {
    userEntity: User,
    externalAuthEntity: SocialLogin,
    methods: {
      gitHub: {}
    },
    onAuthFailedRedirectTo: "/login"
  },
}
app myApp {
  wasp: {
    version: "^0.11.0"
  },
  title: "My App",
  auth: {
    userEntity: User,
    externalAuthEntity: SocialLogin,
    methods: {
      gitHub: {}
    },
    onAuthFailedRedirectTo: "/login"
  },
}
When a user signs in for the first time, Wasp creates a new user account and links it to the chosen auth provider account for future logins.
Also, if the userEntity has:
- A
usernamefield: Wasp sets it to a random username (e.g.nice-blue-horse-14357). - A
passwordfield: Wasp sets it to a random string.
This is a historical coupling between auth methods we plan to remove in the future.
Overrides
Wasp lets you override the default behavior. You can create custom setups, such as allowing users to define a custom username rather instead of getting a randomly generated one.
There are two mechanisms (functions) used for overriding the default behavior:
getUserFieldsFnconfigFn
Let's explore them in more detail.
Using the User's Provider Account Details
When a user logs in using a social login provider, the backend receives some data about the user.
Wasp lets you access this data inside the getUserFieldsFn function.
For example, the User entity can include a displayName field which you can set based on the details received from the provider.
Wasp also lets you customize the configuration of the providers' settings using the configFn function.
Let's use this example to show both functions in action:
- JavaScript
- TypeScript
app myApp {
  wasp: {
    version: "^0.11.0"
  },
  title: "My App",
  auth: {
    userEntity: User,
    externalAuthEntity: SocialLogin,
    methods: {
      gitHub: {
        configFn: import { getConfig } from "@server/auth/github.js",
        getUserFieldsFn: import { getUserFields } from "@server/auth/github.js"
      }
    },
    onAuthFailedRedirectTo: "/login"
  },
}

entity User {=psl
    id                        Int     @id @default(autoincrement())
    username                  String  @unique
    displayName               String
    externalAuthAssociations  SocialLogin[]
psl=}

// ...
import { generateAvailableDictionaryUsername } from "@wasp/core/auth.js";

export const getUserFields = async (_context, args) => {
  const username = await generateAvailableDictionaryUsername();
  const displayName = args.profile.displayName;
  return { username, displayName };
};

export function getConfig() {
  return {
    clientID // look up from env or elsewhere
    clientSecret // look up from env or elsewhere
    scope: [],
  };
}
app myApp {
  wasp: {
    version: "^0.11.0"
  },
  title: "My App",
  auth: {
    userEntity: User,
    externalAuthEntity: SocialLogin,
    methods: {
      gitHub: {
        configFn: import { getConfig } from "@server/auth/github.js",
        getUserFieldsFn: import { getUserFields } from "@server/auth/github.js"
      }
    },
    onAuthFailedRedirectTo: "/login"
  },
}

entity User {=psl
    id                        Int     @id @default(autoincrement())
    username                  String  @unique
    displayName               String
    externalAuthAssociations  SocialLogin[]
psl=}

// ...
import type { GetUserFieldsFn } from '@wasp/types'
import { generateAvailableDictionaryUsername } from '@wasp/core/auth.js'

export const getUserFields: GetUserFieldsFn = async (_context, args) => {
  const username = await generateAvailableDictionaryUsername()
  const displayName = args.profile.displayName
  return { username, displayName }
}

export function getConfig() {
  return {
    clientID, // look up from env or elsewhere
    clientSecret, // look up from env or elsewhere
    scope: [],
  }
}
Wasp automatically generates the type GetUserFieldsFn to help you correctly type your getUserFields function.
Using Auth
To read more about how to set up the logout button and get access to the logged-in user in both client and server code, read the docs on using auth.
API Reference
Provider-specific behavior comes down to implementing two functions.
configFngetUserFieldsFn
The reference shows how to define both.
For behavior common to all providers, check the general API Reference.
- JavaScript
- TypeScript
app myApp {
  wasp: {
    version: "^0.11.0"
  },
  title: "My App",
  auth: {
    userEntity: User,
    externalAuthEntity: SocialLogin,
    methods: {
      gitHub: {
        configFn: import { getConfig } from "@server/auth/github.js",
        getUserFieldsFn: import { getUserFields } from "@server/auth/github.js"
      }
    },
    onAuthFailedRedirectTo: "/login"
  },
}
The gitHub dict has the following properties:
-
configFn: ServerImportThis function should return an object with the Client ID, Client Secret, and scope for the OAuth provider.
- JavaScript
- TypeScript
src/server/auth/github.jsexport function getConfig() {return {clientID, // look up from env or elsewhereclientSecret, // look up from env or elsewherescope: [],}}src/server/auth/github.tsexport function getConfig() {return {clientID, // look up from env or elsewhereclientSecret, // look up from env or elsewherescope: [],}} -
getUserFieldsFn: ServerImportThis function should return the user fields to use when creating a new user.
The
contextcontains theUserentity, and theargsobject contains GitHub profile information. You can do whatever you want with this information (e.g., generate a username).Here is how you could generate a username based on the Github display name:
- JavaScript
- TypeScript
src/server/auth/github.jsimport { generateAvailableUsername } from '@wasp/core/auth.js'export const getUserFields = async (_context, args) => {const username = await generateAvailableUsername(args.profile.displayName.split(' '),{ separator: '.' })return { username }}src/server/auth/github.tsimport type { GetUserFieldsFn } from '@wasp/types'import { generateAvailableUsername } from '@wasp/core/auth.js'export const getUserFields: GetUserFieldsFn = async (_context, args) => {const username = await generateAvailableUsername(args.profile.displayName.split(' '),{ separator: '.' })return { username }}Wasp exposes two functions that can help you generate usernames. Import them from
@wasp/core/auth.js:generateAvailableUsernametakes an array of strings and an optional separator and generates a string ending with a random number that is not yet in the database. For example, the above could produce something like "Jim.Smith.3984" for a Github user Jim Smith.generateAvailableDictionaryUsernamegenerates a random dictionary phrase that is not yet in the database. For example,nice-blue-horse-27160.