Self-Hosted
If you have your server or rent out a server, you can self-host your Wasp apps. Self-hosting your apps gives you full control over your apps and their data. It can be more cost-effective than a cloud provider since you can deploy multiple apps on a single server. However, you'll need to manage the server yourself, which can be time-consuming and require some technical knowledge.
Guides
We have step-by-step guides for deploying your Wasp app on your server with different methods. Check out the guides below:
Deploying Wasp with Caprover on your server »
Uses Caprover, Github Actions, Github Container Registry
Deploying Wasp with Coolify on your server »
Uses Coolify, Github Actions, Github Container Registry
Deploying Wasp with Docker on your server »
Uses Ubuntu, Git, Caddy, Docker
Manual deployment
We will show you a general overview of the architecture of a self-hosted Wasp app and the steps you need to take to deploy your app on your server. This is a more manual process than using the guides above, but it gives you more control over your deployment and you'll learn how everything works. If you are looking for a more guided deployment, check out the guides above.
What you'll need
To successfully self-host your Wasp app, you need to have the following:
-
A server with a public IP address. There are many cloud providers you can use to rent a server. Some popular ones are AWS, DigitalOcean, OVH, and Hetzner.
-
A domain name, for example,
myapp.com(needed for HTTPS support).
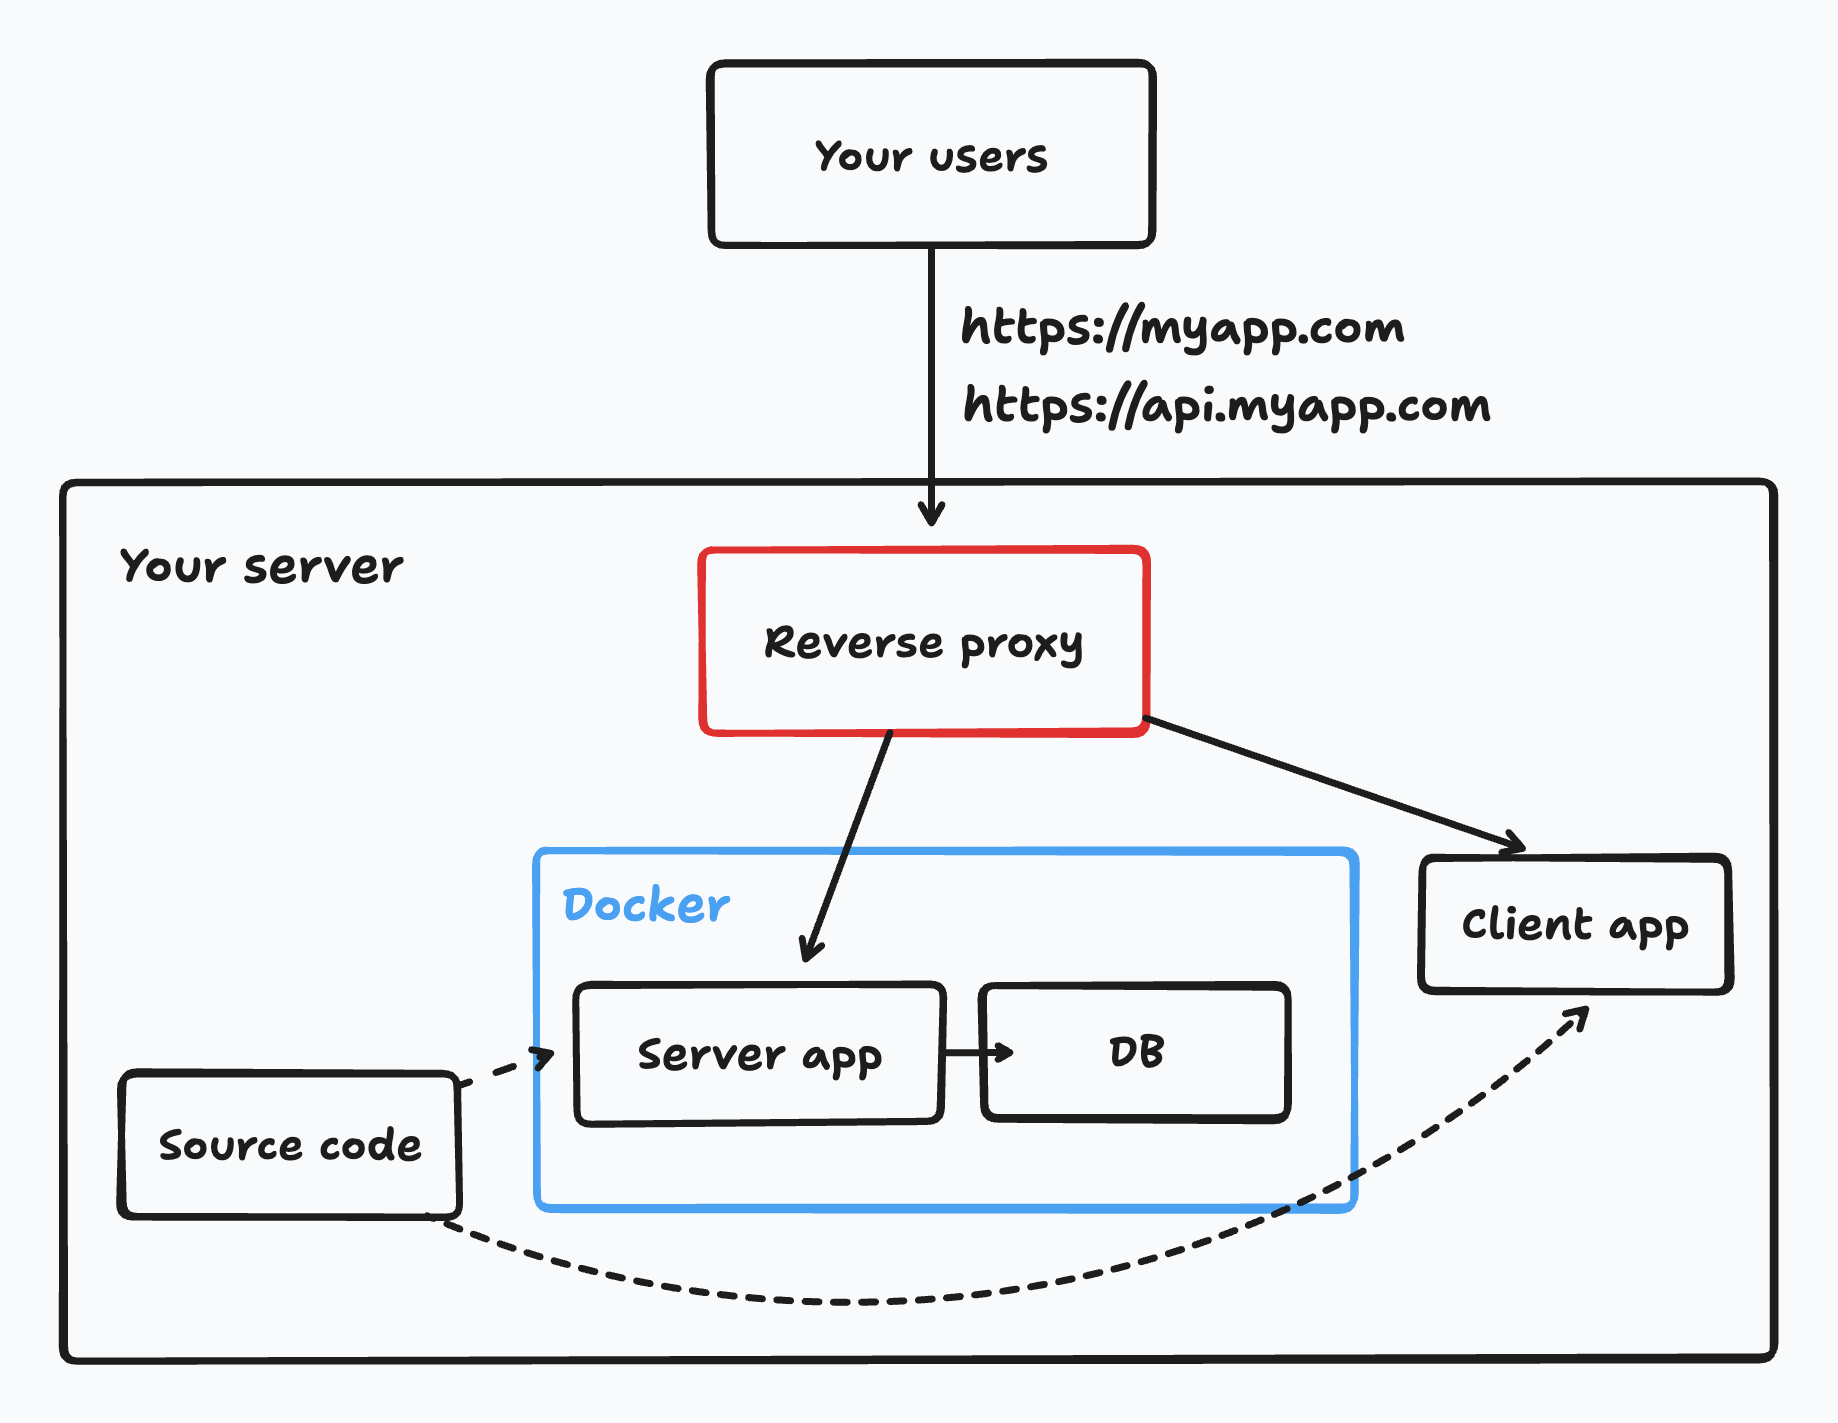
Architecture
To self-host your Wasp app, you'll follow these general steps:
- From your app's code, let Wasp build a server app and a client app.
- Set up the server environment variables on the server.
- Run a database on the server or use a managed database service.
- Run the server app on the server, with or without Docker.
- Serve the client app with a static file server.
- Set up a reverse proxy on the server to be able to use a domain name with HTTPS for your app.
Steps
- Install Docker, Node.js and Wasp CLI.
- Get your app's source code.
- We recommend using Git to clone your app's repository and then pulling the latest changes when you want to deploy a new version. You can use any other method to get your app's code on the server.
- Build your app with
wasp build. - Build and run the server app.
- Wasp gives you a
Dockerfilein the.wasp/outdirectory that you can use to build and run the server app. - We are using Docker to run the server app, but you can run it without Docker if you prefer - just make sure to replicate the setup in the
Dockerfile. - When you run the server app with Docker, you need to setup the server env variables. You can do this with a
.envfile or by passing the env variables directly to thedocker runcommand.
- Wasp gives you a
- Start the database on the server or use a managed database service.
- We usually run the database in Docker on the same server, but you can run the database directly on the server.
- You can also use a managed database service which you can connect to from your server. This is a great option if you don't want to manage the database yourself, but it can be more expensive.
- Build the client app into static files.
- Wasp outputs the client app in the
.wasp/out/web-appdirectory.
- You should build the client app into static files.
- Wasp outputs the client app in the
- Install and set up a reverse proxy to serve your client and server apps.
- Point your domain(s) to your server's IP address.
- We recommend setting
myapp.comfor the client andapi.myapp.comfor the server. - The reverse proxy should serve the client app on
myapp.comand proxy requests to the server app onapi.myapp.com. Make sure your env variables are using these client and server URLs.
- We recommend setting
Database setup
By default, our self-hosted deployment methods run the database on your server. When you run the database on your server, you need to take care of backups, updates, and scaling. We suggest setting up PostgresSQL periodic backups and/or taking snapshots of your server's disk. In case something bad happens to your server, you can restore your database from the backups.
If you prefer not to manage the database yourself, you can use a managed database service. The service provider takes care of backups, updates, and scaling for you but it can be more expensive than running the database on your server. Some popular managed database services are AWS RDS, DigitalOcean Managed Databases, and Supabase.